Let's build some circuits! We'll draw these on the whiteboard as we go. Make sure you copy them down!
We'll use Ohm's Law to figure out the current limiting resistor value. The one catch is that since and LED is a diode, it has a "voltage drop" across it, which means it eats up some of our voltage. Usually the drop is about 2v (the exact amount depends on the LED color and type). So instead of 9v we'll use 7v in the equation. We'll also assume that the LED can take 20mA of current (a pretty standard value). Remember that the long leg of the LED is +.
Now's a good time to practice using a multimeter to take a current reading. Remember that to read current you have to break a connection in the circuit and insert the multimeter leads into the circuit. You DON'T just put the leads on either side of a component like you do when measuring voltage or resistance. Doing so will blow out your meter.
Make sure you don't turn your trim pot all the way to zero! You'll burn out your LED real quick. Maybe put a little fixed resistor in the circuit to protect the LED
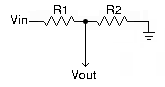
A voltage divider is a very common, simple circuit that is used in many sensor schemes. It consists of a voltage source and two resistors. When you connect the resistors in series and tap the connection between them, they form a voltage divider. Each resistor "drops" a portion of the total voltage.
The voltage at Vout is related to the ratio of R1 to R2. More specifically:
Vout = Vin * (R2/(R1 + R2))
So if R1 = 1k Ohms and R2 = 1K Ohms and Vin = +5v, then:
Vout = 5v * (1000/(1000 + 1000))
Vout = 5v * 1000/2000
Vout = 5v * .5
Vout = 2.5v
Or if R1 = 1k Ohms and R2 = 2K Ohms and Vin = +5v, then:
Vout = 5v * (2000/(1000 + 2000))
Vout = 5v * 2000/3000
Vout = 5v * .666
Vout = 3.3v
It's intuitive if you picture the Vout in the schematic above as moving towards or away from the Vin. If it's close to the Vin, then the left resistor is smaller and the voltage at the tap is higher (since it's closer to the + voltage). If it's close to ground, then the left resistor is larger and the voltage at the tap is lower, since it's closer to ground.
Now make a voltage divider with a potentiometer. How convenient, it has three legs! And we need three connections (Vin, Vout, ground) for a voltage divider! Internally, a potentiometer works exactly as I've described above. As you turn the knob the tap moves towards either the Vin or the ground.
Can we use a voltage divider to provide a lower voltage to some other part of our circuit? Sort of, but it's wasteful and not very stable. Use a voltage regulator instead.
A voltage regulator is an IC that takes an input voltage (like 9v) and turns it into another voltage (like 5v). Voltage regulators are useful if you need different voltage sources in your circuit but you don't want to have to use separate power supplies. For instance, most electronics run on 5v, but many motors run on 12v. So you can use a 12v supply for the motors and a voltage regulator to turn that same 12v into 5v for the electronics. The next circuits we'll build need +5v, so we'll hook up a voltage regulator to our 9v battery.
Capacitors are often used on voltage regulators to supress noise. Most electronic devices are sensitive to noise, and will act up if the power supply isn't clean. Caps used in this way are called "power supply bypass caps" or "signal conditioning caps".